I was scrolling through twitter the other day and happened upon my friend, Jake Dohm, pretty upset that he'd recorded a whole bunch of stuff without audio.
To be honest, my first instinct was confusion. Didn't he do that on purpose?
As it turns out, no, he didn't. But I do! So I figured I'd write about my screencasting process. Who knows, perhaps it'll work for others as well.
Practice my code
The first thing I do when making an instructional video is to test out what code I'm going to write. There are normally a few pieces to this:
- Figure out the variable names and syntax
- Determine what editor I'm using
- Make sure it works!
The second point is probably the most important. Sometimes I'll use the Node.js REPL directly in my terminal. Sometimes I'll use a VS Code window and the browser. Other times Codesandbox or Codepen make sense. It's often dependent on how new the syntax is and the best way to highlight the behavior without too much setup.
Make the video
Once I know what I'm going to type out I'll prepare my windows. In an ideal situation I can increase the font for whatever editor experience I'm using. I also make sure to turn off notifications, remove extraneous visuals (like the bookmark bar in the browser), etc.
As a tip, make your relevant windows cover most of your screen, this will come in handy later.
Then I can fire up Screenflow and set it to record my screen only (no audio). I run through my code sample and make sure to leave some buffer at the end before my cursor moves to close a window or whatnot.
This normally takes me one or two takes to get right. Way more if I skipped the practice step, so I highly recommend not doing that.
Edit video content
The first thing I do is edit the look of the video. The amount of manipulation that is necessary varies.
I almost always need to resize the screen and focus on only the important information. Recording with larger windows makes this easier since it can only resize to specific dimensions. You can access this functionality with the resize button.

As it turns out, in writing this post I discovered that there is also cropping functionality that is separate. I haven't used it, but if you do let me know what you think.
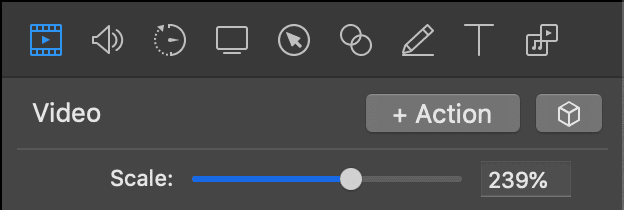
In some cases, I need to alter the font size in post. This is typically true when recording the inspector window in a browser. You can do this by selecting your video track and using the "Scale" functionality. I've added a screenshot here to help you locate it.

Note that in the case where you need to scale you'll likely want to do that prior to resizing.
The last feature I use is annotations. Under Insert you can add an annotations clip. This can be a colored box, an arrow, even text. The main use cases for this are to cover up something you couldn't crop out or add a trivial character like a slash.
If anyone wants to be a detective you can go through my Vue router course and find where I added a character to my code.
Add narration
This is the piece of my process that I'm told is somewhat unique. Once I have confidence in the video, then I add my voiceover. I use the Insert > Narration functionality.
First, I make sure my Shure microphone is selected as the input. Then I talk through the code that appears on the screen.
In most cases, this is one or two takes and far easier to time when I'm not focused on typing! It helps me keep my egghead videos super concise.
Freeze frame
In some circumstances, I discover that I can't talk as fast as I'd typed! I used to think that required me to re-record, but then I discovered freeze frame.
Essentially, you can add length to a specific section of your recording. I'll usually select a frame that represents the end of a specific line of code and hold there so I can add the necessary narration.
Results
I've found this method of recording incredibly successful! I was able to finish the video only piece of my course (after lots of practice) in about a day. Then I came back, added narration, and was mostly good to go.
Making egghead content requires far more than just developing the recordings so having a streamlined process helps a lot.
